Copper sink care
Learning how to clean a copper sink is mostly about protecting its finish. The safest routine removes food and residue while respecting the dark, mottled patina that makes living copper distinctive.
Quick verdict
Clean the soil—not the patina
To learn how to clean a copper sink safely, start by checking whether it has a living, waxed, polished or clear-coated finish. For the conservative baseline, use warm water, a small amount of mild dish soap and a soft cloth or non-abrasive sponge. Rinse completely, towel-dry and inspect before doing anything stronger.
Do not begin with vinegar, lemon, ketchup, salt, abrasive powder or copper polish. Those methods may brighten copper by changing or removing patina, and they may damage a protective coating.
Why the Copper Finish Matters Before You Clean
Before deciding how to clean a copper sink, identify its complete care system. Two sinks that look similar may respond differently because one is intentionally left unsealed, another carries a factory-applied patina, and a third has wax or a clear protective coating.
Unlacquered copper is often called a living finish. Its color changes as the metal reacts with water, air, food and ordinary use. Brown, dark and mottled areas can be part of that natural evolution rather than evidence that the basin is dirty. Native Trails’ finish-specific care guidance, for example, describes this changing patina on its unsealed copper finishes.
A sealed sink is different. Aggressive scrubbing or metal polish may scratch, cloud or thin the coating. Because finish names vary by manufacturer, the model name, invoice, installation guide or current care page is more reliable than appearance alone.
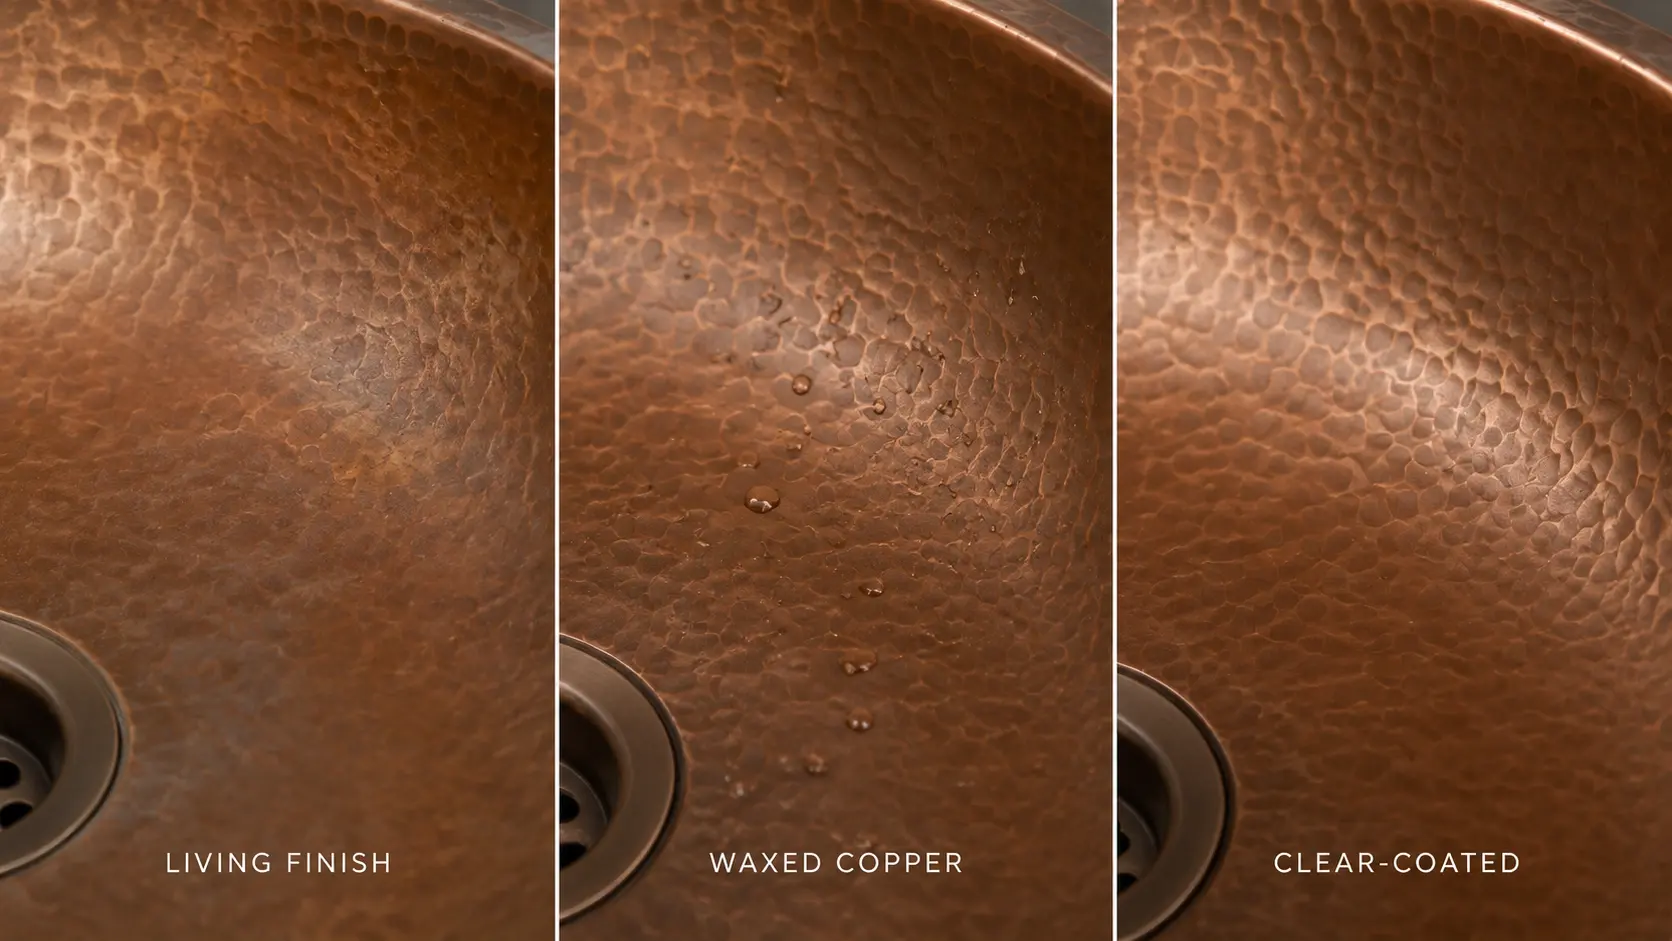
Identify Your Copper Sink’s Finish
Living or factory-patinated copper
Expect gradual color variation. The priority is removing soil without trying to make every area the same shade.
Waxed copper
Wax can slow color change and reduce spotting, but its use and renewal schedule are manufacturer-dependent.
Clear-coated or lacquered copper
The coating—not bare copper—is the surface being cleaned. Avoid polish, solvents and abrasion unless explicitly approved.
Bright polished copper
Maintaining a bright appearance is a separate polishing task. Follow the exact maker’s product and protection instructions.
If you cannot identify the finish, use only the gentle baseline below and stop before stain removal, polishing or waxing. That finish check is the first practical step in how to clean a copper sink without causing an avoidable color change.
How to Clean a Copper Sink in 7 Safe Steps
If you are asking how to clean a copper sink during normal care, use the following sequence. It is designed for routine soil and residue; it does not promise to remove patina, repair scratches or restore a damaged coating.
Confirm the manufacturer and finish
Check the model label, purchase record, installation paperwork or manufacturer’s current care guide. Note whether the finish is living, factory-patinated, waxed, polished or sealed.
Empty the basin
Remove dishes, grids and loose debris. Grit trapped beneath a sponge can scratch copper, which is a comparatively soft metal.
Rinse away loose residue
Use warm water to move food particles toward the drain. Do not use extreme heat or leave acidic food sitting while you prepare to clean.
Wash gently with mild dish soap
Put a small amount of mild dish soap on a clean soft cloth or the soft side of a non-abrasive sponge. Wipe the bowl with light, even pressure, including the corners and drain area.
Rinse completely
Remove all soap rather than letting it dry into another film. Pay attention to hammered recesses, corners and the area around the drain.
Towel-dry the sink
Use a clean soft towel or microfiber cloth. Drying reduces water spotting and makes it possible to judge the real color and sheen.
Inspect before repeating
Look under ordinary angled light. If greasy film remains, repeat only the same gentle method once. If the color, coating or texture changed, stop and diagnose instead of escalating.
Copper sink cleaning decision path
Find the maker and finish.
Use mild soap and a soft cloth.
Rinse away all residue.
Inspect color, feel and sheen.
Stop. Resume routine care.
Diagnose it and follow finish-specific manufacturer guidance.
Is It Dirt, Patina, Residue or Finish Damage?
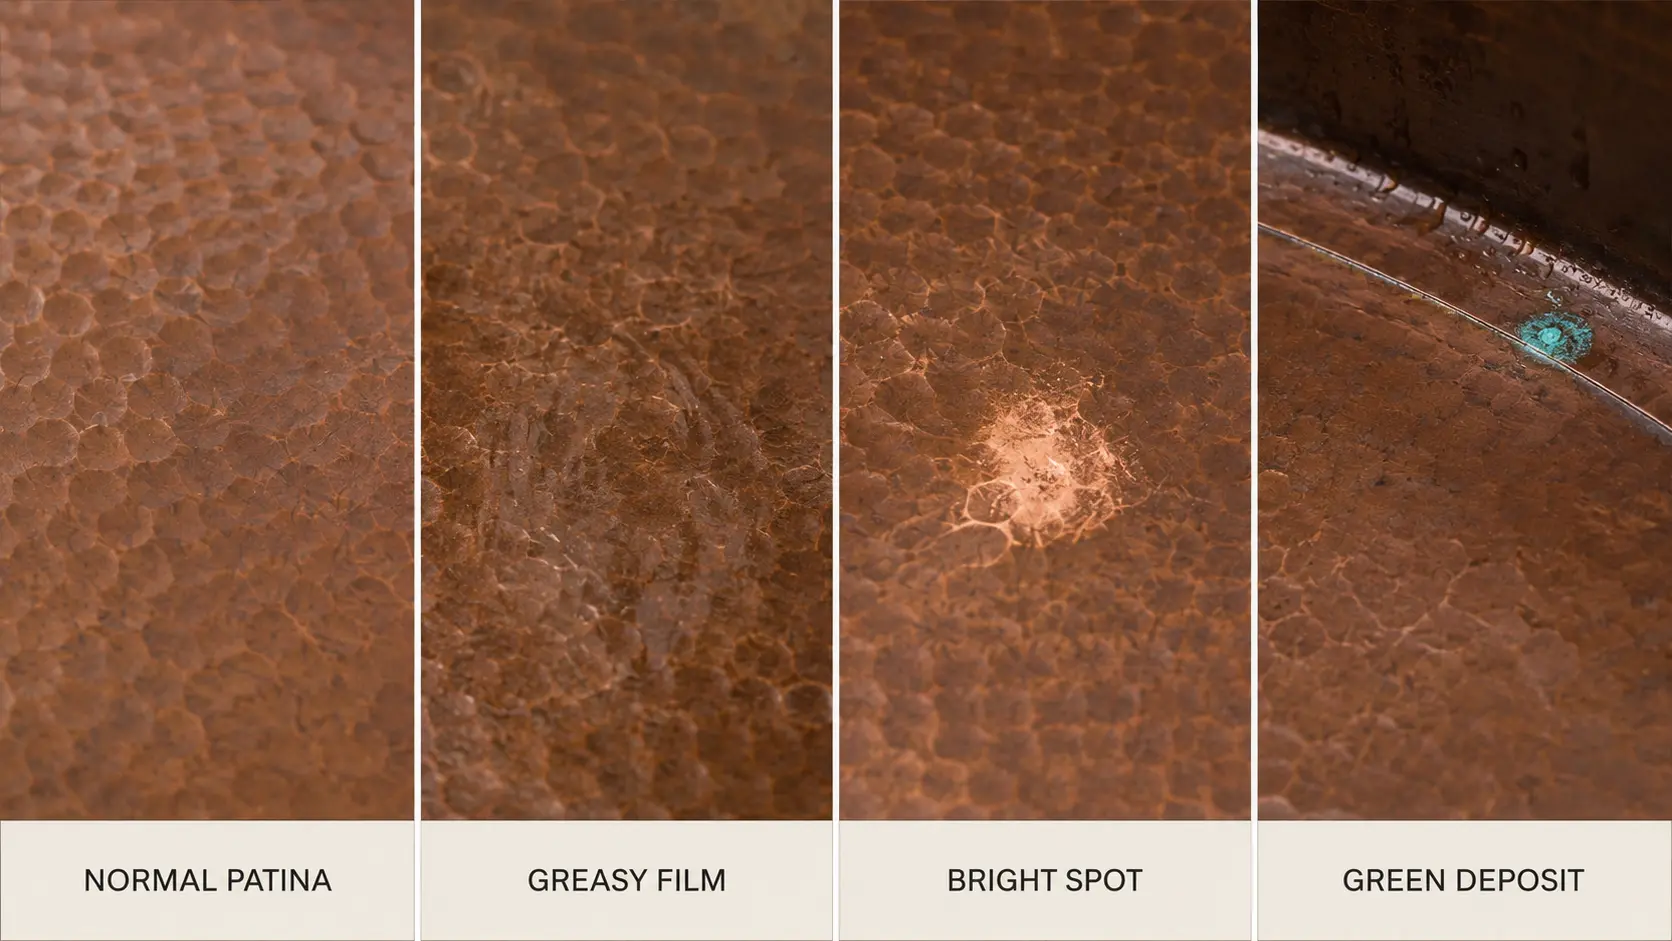
A reliable guide to how to clean a copper sink must separate ordinary soil from finish change. The location, texture and recent cleaning history are more useful than color alone. This table provides a safe first classification—not a remote guarantee.
| What You See | More Consistent With | Safest Next Action |
|---|---|---|
| Even or mottled brown-to-dark color | Normal living-patina development | Clean gently; do not polish merely to make the color uniform. |
| Smeary or greasy film | Food oil, soap or cleaner residue | Repeat the mild-soap wash once, rinse thoroughly and dry. |
| Chalky pale spots near the drain or faucet | Possible hard-water mineral deposit | Start gently; check the exact manufacturer before any descaler. |
| Bright copper patch after lemon, tomato, vinegar or ketchup | Patina altered or removed by acid | Rinse, dry and stop. Ask the maker whether to allow natural re-patination or use its repair system. |
| Small raised blue-green material in a persistently wet area | A moisture-related deposit or copper corrosion product requiring confirmation | Clean gently and dry. Contact the maker if it remains, spreads or returns. |
| Lines or scuffs visible on the dry surface | Scratching or abrasion | Stop scrubbing; check whether the finish has an approved repair procedure. |
| Cloudy, flaking or peeling transparent layer | Possible clear-coat failure | Stop using cleaners or polish and seek manufacturer or professional refinishing guidance. |
What to Do About Common Copper Sink Marks
The correct response changes with the mark. The guidance below extends the basic method for how to clean a copper sink without turning every discoloration into a polishing project.
Greasy or smeary residue
Repeat the routine wash once with fresh warm water, a small amount of mild dish soap and a clean soft cloth. Rinse more thoroughly than before. If the film remains unchanged when dry, check whether a wax, polish or previous cleaner has left a coating that requires brand-specific instructions.
Dark or uneven color
Uneven color is normal on many living finishes. Sinkology’s copper care guide and Native Trails both explain that copper changes with use and its environment. Do not treat a clean dark area as contamination simply because it is not bright copper.
Bright spots after acidic food or cleaner
Lemon, tomato, vinegar, wine and ketchup can brighten exposed copper by altering the patina. Rinse away the substance, dry the basin and avoid trying to darken the spot with another household chemical. Some unsealed finishes gradually re-patinate, but the timing and final color cannot be guaranteed.
White or chalky water spots
Begin with the mild-soap method and complete drying. If mineral residue remains, consult the exact sink’s care instructions before using vinegar or a commercial descaler. An acidic method accepted for one unsealed finish may be unsuitable for a coating on another sink.
Green or blue-green deposits
Persistent moisture, soap residue and copper’s interaction with its environment can contribute to green deposits. First remove ordinary surface soil gently and dry the area. If a raised deposit remains, returns quickly, covers a food-contact area, or appears with pitting, obtain manufacturer guidance rather than experimenting with acid or abrasive powder.
Scratches
Cleaning cannot remove a physical scratch. The appearance of a shallow mark on living copper may soften as the finish evolves, but polishing one small area can create a brighter patch. Deep scratches, coating damage and sharp edges require finish-specific repair advice.
Cloudy or peeling clear coat
A compromised coating is not removable dirt. Do not apply copper cleaner underneath or around a failing clear layer. Record the sink model, take photographs and contact the manufacturer, installer or a qualified metal refinisher.
What Not to Use on a Copper Sink
Knowing how to clean a copper sink also means knowing when common household products are too aggressive. Unless the current instructions for your exact finish expressly allow it, keep the following out of routine care:
- Steel wool or metal pads
- Abrasive scouring powders
- Melamine foam used as a default scrubber
- Bleach or ammonia
- Drain cleaner on the basin surface
- Vinegar, lemon or ketchup treatments
- Salt-based scrubs
- Unapproved copper or metal polish
Can You Polish or Wax a Copper Sink?
After learning how to clean a copper sink, decide separately whether you want to alter or protect its appearance. Cleaning, polishing and waxing are not interchangeable tasks.
Polishing changes appearance
Polishing is not the same as cleaning. Its purpose is generally to remove oxidation and expose brighter metal. That may be appropriate for a bright polished sink when the manufacturer specifies a compatible product, but it defeats the goal of preserving an antique or living patina. It may also damage a lacquered finish.
Wax is optional and finish-dependent
Some manufacturers permit carnauba or proprietary copper wax to slow color change and reduce spotting. Others provide their own care system. Thompson’s finish-by-finish instructions illustrate why the evolved and sealed categories cannot be treated identically. Confirm the product, application method and renewal guidance for your sink; do not assume automotive wax, furniture wax, oil and copper wax are interchangeable.
Simple Care That Prevents Aggressive Deep Cleaning
- Rinse food, toothpaste, cosmetics and acidic liquids promptly.
- Do not leave wet sponges, cans, metal cookware or standing water in the basin.
- Use a sink grid only if it fits correctly and the manufacturer permits it; clean beneath it regularly.
- Rinse away dish soap rather than letting it dry in hammered recesses.
- Towel-dry high-visibility areas when practical, especially where hard water leaves spots.
- Keep abrasive pads and strong cleaners out of the routine-care kit.
- Photograph the finish before trying any manufacturer-approved restorative treatment.
Routine gentle cleaning is more predictable than allowing residue to accumulate and then trying to force the sink back to a uniform color.
When to Stop Cleaning and Ask for Help
Move from cleaning to manufacturer or professional guidance when:
- you cannot determine whether the sink is sealed;
- a large area became bright after an acid or metal cleaner;
- the clear coat looks cloudy, blistered, flaking or peeled;
- green material persists, spreads, returns quickly or accompanies pitting;
- the surface has deep scratches, gouges or sharp damage;
- bleach, ammonia, drain cleaner or another aggressive chemical changed the finish; or
- the warranty requires an approved care or repair process.
Take clear photographs in dry, neutral light. Record the product used, how long it contacted the sink and what changed. That information helps the manufacturer distinguish residue from finish alteration.
Copper Sink Cleaning FAQs
Can I use vinegar to clean a copper sink?
Do not use vinegar as a universal copper-sink cleaner. It can brighten exposed copper by altering patina and may be incompatible with a protective finish. Use it only if the current instructions for your exact sink and finish expressly permit it.
How to clean a copper sink with dish soap?
Yes. For how to clean a copper sink routinely, mild dish soap, warm water and a soft cloth are the baseline published by several manufacturers. Avoid soaps containing abrasive particles, strong acids, bleach or other aggressive additives, and confirm your model’s instructions.
Can I use baking soda on copper?
Not as a universal first step. Baking soda is mildly abrasive, and manufacturer advice varies. Begin with mild soap; use baking soda only when your exact sink manufacturer permits it for the identified condition.
Why is my copper sink turning dark?
An unsealed living copper finish naturally develops darker and mottled patina as it reacts with its environment. If the surface is clean and intact, color change alone does not mean the sink is dirty or damaged.
Why did lemon or ketchup leave a bright spot?
Acidic food can alter or remove part of the patina, exposing brighter copper. Rinse and dry the area. Do not try to force a color match with another chemical; ask the manufacturer whether natural re-patination or a specific repair system is recommended.
Can I use Bar Keepers Friend on a copper sink?
Only if your exact sink manufacturer approves the exact product for that finish and purpose. Some finish-care instructions explicitly prohibit it because it can strip patina or affect a protective layer.
Should I wax my copper sink?
Wax is optional and manufacturer-dependent. A compatible wax may slow patina development or reduce spotting, but it should not be added blindly to an unknown coating or substituted for cleaning.
How often should I clean a copper sink?
Rinse away food and residue after use and wash gently whenever soil or film is present. The practical frequency depends on whether it is a kitchen or bathroom sink, water hardness and the manufacturer’s care schedule.
Will a bright spot regain its patina?
Many unsealed copper finishes gradually change again after an acid-created bright spot, but the timing and exact color match cannot be guaranteed. A sealed or specially finished sink may behave differently, so verify the model before attempting restoration.
The Safest Final Recommendation
The best answer to how to clean a copper sink is deliberately simple: identify the finish, wash with mild dish soap and a soft cloth, rinse completely, towel-dry and judge the result before doing more.
When clean copper remains dark or mottled, you may be looking at the finish—not dirt. When an area turns bright, green, scratched, cloudy or begins to peel, stop treating it as ordinary soil. Preserve the evidence and move to instructions for the exact manufacturer and finish.